Views: 0 Author: Site Editor Publish Time: 2025-10-16 Origin: Site


### **How to Set Up Your MIG Welding Torch for Optimal Performance**
A perfectly tuned MIG welding torch is the difference between a smooth, clean weld and a frustrating battle with porosity, bird-nesting, and an inconsistent arc. Whether you're a seasoned professional or a weekend warrior, taking the time to set up your torch correctly is the most critical step in any welding project.
This guide will walk you through the key components and steps to ensure your MIG welding torch—be it a trusted **Binzel**, **Tweco**, **Miller**, or **Lincoln**—is configured for peak performance.
#### **Anatomy of Your MIG Welding Torch: Know the Key Players**
Before we start assembling, let's identify the crucial components that work together to create that perfect weld. Using **high quality materials** in these parts is non-negotiable for reliability.
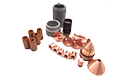
1. **The Cable Assembly:** This includes the **copper cable liner** inside the hose package. A clean, smooth liner is essential for consistent wire feed. Kinks or debris here are a primary cause of wire feed issues.
2. **Gas Diffuser:** Located inside the torch neck, the **gas diffuser** does exactly what its name implies—it evenly distributes shielding gas around the weld pool. A clogged or damaged diffuser leads to uneven gas coverage and porosity.
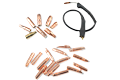
3. **Contact Tip:** This is the business end. The **contact tip** transfers the electrical current to the welding wire. It must be the correct size for your wire diameter and be kept clean of spatter to ensure a stable arc.
4. **Nozzle:** The **nozzle** focuses the shielding gas onto the weld zone. It’s important to keep it free of spatter to maintain proper gas **shield**.
5. **Retaining Cap (or Nozzle Insulator):** This component, often overlooked, screws onto the torch body and locks the **gas diffuser**, **contact tip**, and **nozzle** securely in place. A tight fit here prevents gas leaks and electrical issues.
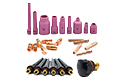
> **Pro Tip:** While a MIG torch is for joining metal, don't confuse it with a **soldering gun** for electronics or a **plasma cutting torch** for slicing through metal. For instance, a **Trafimet** **P80 cutting torch** or a **PT80 cutting gun** is designed for plasma cutting with a focused **air tube** for compressed gas and a different **electrode** and **nozzle** setup. Using the right tool for the job is step zero!
#### **The Step-by-Step Setup for a Flawless Weld**
Follow these steps to assemble your MIG welding torch correctly.
**Step 1: Prepare the Torch Body**
Ensure the torch is disconnected from the welder. Inspect the end of the torch neck where the diffuser sits. Clean any spatter or debris with a small wire brush.
**Step 2: Install the Gas Diffuser**
Screw the **gas diffuser** into the torch body by hand until it is snug. Avoid over-tightening, as this can damage the threads. A good **gas diffuser** made from **high quality materials** like copper alloy will ensure optimal gas flow and electrical conductivity.
**Step 3: Insert the Contact Tip**
Thread the **contact tip** into the diffuser. Again, hand-tight is usually sufficient. You should feel it seat securely against the diffuser. This metal-to-metal contact is vital for transferring welding current.
**Step 4: Secure the Nozzle & Retaining Cap**
Slide the **nozzle** over the **contact tip**. Then, screw the **retaining cap** onto the torch body. The **retaining cap** applies the right amount of pressure to hold everything together. Tighten it firmly by hand.
#### **Pro Tips for Maintenance and Troubleshooting**
* **Anti-Spatter is Your Friend:** A quick spray of anti-spatter on the **nozzle** and **contact tip** before welding can save you a lot of cleaning time.
* **Check Your Consumables:** **Contact tips** and **nozzles** are consumable items. A worn or oval-shaped contact tip will cause an erratic arc. Replace them regularly.
* **Inspect the Liner:** If you're experiencing persistent wire feed problems, check your **copper cable liner**. A damaged liner will need to be replaced.
* **Gas Flow Check:** After assembly, do a quick gas test. Set your gas flow on the regulator, hold the torch near your face, and pull the trigger. You should feel a smooth flow of gas. No gas? Check for loose connections or a blocked **gas diffuser**.
#### **Why Quality and Reliable Supply Matter**
Your torch is only as good as its weakest part. Investing in genuine or high-quality aftermarket consumables from brands like **Binzel** or **Tweco** ensures better performance, longer life, and fewer headaches. When you need a part, finding a supplier that offers **fast delivery** on these **high quality materials** means less downtime and more time welding.
A correctly set up **MIG welding torch** is a joy to use. By understanding the role of each component—from the **gas diffuser** to the **retaining cap**—and following a meticulous assembly process, you’ll achieve cleaner welds, increased productivity, and a much more enjoyable welding experience.